Friday 17 December 2010

Dropbox has Reached Version 1.0!


The excellent cross-platform folder syncing app Dropbox has just reached version 1.0 and has some great new features, chief among them being Selective Sync. This means that you can select which folders you want to sync on each machine, handy for devices that are limited on space or for folders you don't want to sync to your work or home computer. On Ubuntu I found out, thanks to Dropbox Support on Twitter, that Dropbox version is different to the nautilus-dropbox version. To get it to upgrade on Ubuntu, I needed to download a replacement files to replace the ".dropbox-dist" hidden folder (download the 32 bit or 64 bit version). I had to extract the package in a temporary folder then move it to /home/username/ replacing the files already there. According to Webupd8 You could also delete or move that folder and Dropbox should download the upgrade itself.

Saturday 6 November 2010

Rockbox On My Sansa Fuze

Recently I tested my Sansa Fuze to see if it is gapless using Dark Side of The Moon by Pink Floyd. It's not only a great album but also almost all the tracks follow on from each other without any gaps. I was disappointed to hear a small but noticeable gap between tracks, so I decided to install Rockbox on it. Rockbox is an alternative firmware for many different digital audio players.


To install it you download and install the rockbox utility for Linux, OSX or Windows. Then plug in your player, fire it up and it should auto-detect which player you have as long as it's supported. Then click 'Complete Installation' or 'Minimal Installation' if you're short on space or don't want to install everything. I chose the complete option. Rockbox comes with lots of plugins and themes, I went for the Cabbie theme.


For the Sansa Fuze you need the bin file from the original firmware for it to modify as it dual boots the original firmware and Rockbox. Once installed it should now boot up in Rockbox. I noticed though that you need to shut the player down before plugging into the computer, for when you need to add tracks, so that it boots into the original firmware. The computer doesn't 'see' the player while it's booted into Rockbox. Once you safely remove the player (right click and select 'safely remove' in Ubuntu) shut it down then start it up again and it should boot back into Rockbox. So my Sansa Fuze is now gapless and has extra apps and themes, and can play even more codecs. I'm rather pleased.

Update
I've also found one useful feature of Rockbox is I can now log all my played tracks with Last.fm using a choice of different scrobblers, at the moment I'm using dap-scrob.

Update 2 - Hidden tracks

I noticed every now and then some tracks I didn't recognise and discovered Sansa had already put some tracks preinstalled on the player. These have been added using MTP mode and you can see them in Rockbox in Files --> ##MUSIC#. I found the only way to delete them is to set the original firmware into MTP mode then open up Rhythmbox or similar player that can use MTP and order the tracks by date added. The tracks I dragged 'n' dropped had no time but the pre-installed ones do, hence easier to track down and delete.

Sunday 24 October 2010

Rhythmbox Annoyances

I've seen a lot of swish looking mock-ups and modified versions of Rhythmbox such as Rhythm-e and others but they all seem to concentrate on it's looks and layout. What I'd like to see is the annoying little bugs and improvements in performance and features which have been in Rhythmbox for years but still haven't been fixed. I only use Rhythmbox for adding music to my mp3 players and mainly use Gmusicbrowser for playing music. Here's a not-exhaustive list of Rhythmbox annoyances and feature requests:


Rhythmbox can only have one music folder.

I've recently discovered this since my 250GB hard drive I store music is nearly full so I have some music on another hard drive but there's no option to add another folder, unlike my preferred player, Gmusicbrowser. This means if I want to add music to my Mp3 player I have to find another option. I could use sym-links but that's inelegant and a new user shouldn't have to do that either. (Apologies for the blurryness of the images, click for a better view, having trouble with Bloggers uploader)


Compare that with Gmusicbrowser with multiple folders:


Erroneous import errors

When scanning or rescanning the music folder, rhythmbox shows "Import Errors" with a red 'no entry' symbol, which makes it hard to ignore, but when you look at them they are mostly album covers. Gmusicbrowser has an option in preferences: "Do not add songs that can't be played" as you can see in the above screenshot.


Visible Columns has no option to change the order they appear.

Pretty much every opther player has the option to move the columns either by dragging them or in preferences. I want Artist, Title, Album, Time, Quality in that order!


There are some things Rhythmbox does do well like handling devices, it works better with mp3 players than Gmusicbrowser (which seems to have no support) and Banshee which has trouble with the SD card in my Sansa Fuze. Also I have recently found out Rhythmbox actually transcodes FLAC and ogg on-the-fly to iPods and accessing DAAP shares works well. But Rhythmbox's school report would read: "Has been essentially coasting for several years, has improved in some areas but needs to buckle up and get this sorted! Must do better."

Wednesday 20 October 2010

Unboxing My Newly Arrived (and early) Birthday Present - a 4GB Sansa Fuze


My main birthday present this year arrived early, it's a 4GB Sansa Fuze mp3 player. I requested a Fuze rather than the new Fuze+ for two reasons. For one you can pick up the 4GB version for around £35 through Amazon and I think it's a backward step removing the scroll-wheel for the Fuze+. My Fuze was nicely packaged in a plastic bubble-pack that arrived in a Jiffy bag that actually fitted through the letterbox, for once. I would have liked to have preserved the packaging a bit but I had to hack it about with scissors to free the little beauty. The back of the pack has the player's specs on and I noticed they don't even mention that it can play FLAC for some reason. It does actually play the usual mp3 and WMA, plus ogg and FLAC, which is another thing it has over an iPod. It's also a lot cheaper than a similar sized Nano and has a microSD card slot for expansion. I'm using my 8GB card that I had in my Sansa Clip+.


Package Contents:


  • 4GB Sansa Fuze Player
  • Proprietary USB lead
  • Earphones
  • 8cm driver disc
  • Pretty little flip booklet for quick usage instructions
  • Instruction booklet

The player feels nice to hold, it's rubberised backside preventing it from slipping out of my hand and the 'piano black' finish to the upper surface looks nice but as usual attracts finger prints very easily. The iPod-like click-wheel is also rubberised. There is a slight rough plastic edge at the base of the player but that's not much to grumble about and it does feel more durable than the Clip+ The power-on slider is on the right-hand side of the player and you slide it down for the Hold function to prevent the buttons being pressed while it sits in your pocket. This is a 'physical' hold function that's much preferable to the smaller Sansa Clip+'s software hold function. I'm not quite sure why the headphone socket is on the bottom edge of the player but it's not much bother, I'll just have it upside down in my jacket pocket.


On turning on the player, I was greeted with a nice little graphic and it booted fast. I checked the firmware version in System -> Settings -> info and no surprises that it isn't the latest version. Upgrading firmware was easy, and much easier and quicker using the manual method rather than using the Windows only update tool. I followed the instructions on Sansa forum, just extract the two files into the root directory of the player, safely remove the player and wait while it updates, which took only a few seconds. The new firmware restricts the volume of the player (to comply with EU regulations) if you set it to English/EU region, so it's best to set the language to English but then set location to "rest of the world" so you can actually hear it properly in noisy areas!


The user interface is rather nice looking, though it takes a little getting used to if you are switching from using an iPod as there are slight differences in navigation. Like the iPod, the Now Playing section shows the album cover and info and click the middle button to show just the album cover or info plus graphic etc. Another thing I like about the Fuze (and other Sansa players) is that you can delete tracks from the player interface and it can show you the info about the track - bitrate, filesize, format etc - which the iPod cannot. As with other Sansa players, the Fuze works best in MSC (mass storage device, like a USB stick) mode when using it with Linux, working well with Rhythmbox on Ubuntu. I find it's best to set the player to only use MSC mode rather than setting it to auto or MTP.

The sound quality is excellent, certainly as good as my iPod Mini, but like the iPod, you're best of ditching the little earbuds you get with it, to take advantage of it. It would be nice if it used a normal micro-USB connector rather than the proprietary connector, much like the iPods, but unlike my iPod's connector, this one stays in better thanks to release clips either side. Also I've seen them on Ebay for about £3 so it's handy to get a spare/replacement cable.

Conclusion

So far I'm very impressed with the Fuze, it's good value for money, particularly compared with an iPod Nano. I like it's interface, great sound quality, codec support, look and feel. As long as it's reliable and the battery life is usable (24hr while playing audio, according to the manual) I'll be happy.


Update

I've installed alternative firmware - Rockbox - on my Fuze to achieve perfect gapless playback - and I've detailed that in a new blogpost.

Enhanced by Zemanta

Monday 11 October 2010

Ubuntu 10.10 - First Impressions

Ubuntu 10.10 (codename: Maverick Meercat) was recently released at 10:10am on 10/10/10. I upgraded from 10.0.4 on my HP nc4400 notebook (2.0ghz Core 2 Duo, 2.5GB RAM, 120GB HDD) and the upgrade went very smoothly. After upgrading all I had to do was re-enable or re-add my PPAs/ software repositories, including adding the new Medibuntu repo. The main things I noticed immediately are slight changes like tweaked login screen, "Ubuntu One - Syncronize this folder" in the Documents folder and the nice new font, so I decided to install Maverick in Virtualbox to experience a fresh install.


After the the live CD has finished booting you are greeted with the new installer. It is even simpler to use than it was previously. As usual you can try the live desktop or start installing straight away.


Next up Ubuntu now has a check list to ensure a smooth install. Also tick "Third Party Software" and you get mp3 playing 'out-the-box'! Also very useful is being able to download updates while installing which saves a bit of time.


Then choose your partitioning - going for fresh install and letting Ubuntu choose automatically here.


..and next a confirmation page, last chance to check your settings before your hard drives are formatted...


User Settings: Here is where I noticed that Ubuntu starts installing whilst you fill in your details, which saves time yet again. After choosing keyboard settings, username password, the installer moves on to....


..the new installer slideshow, which you can now move backwords and forwards in, with a nice little effect. It highlights the new version of Software Centre, Shotwell photo manager (which replaces F-Spot, which I never liked), Ubuntu One's new mobile syncing abilities and Rhythmbox integration, it's new sound applet, Firefox, OpenOffice, and Ubuntu's built-in social networking (Gwibber, Evolution, Empathy, MeMenu).


And soon after (install on a fast machine can be as quick as 10-15 minutes) it's time to reboot into the install.


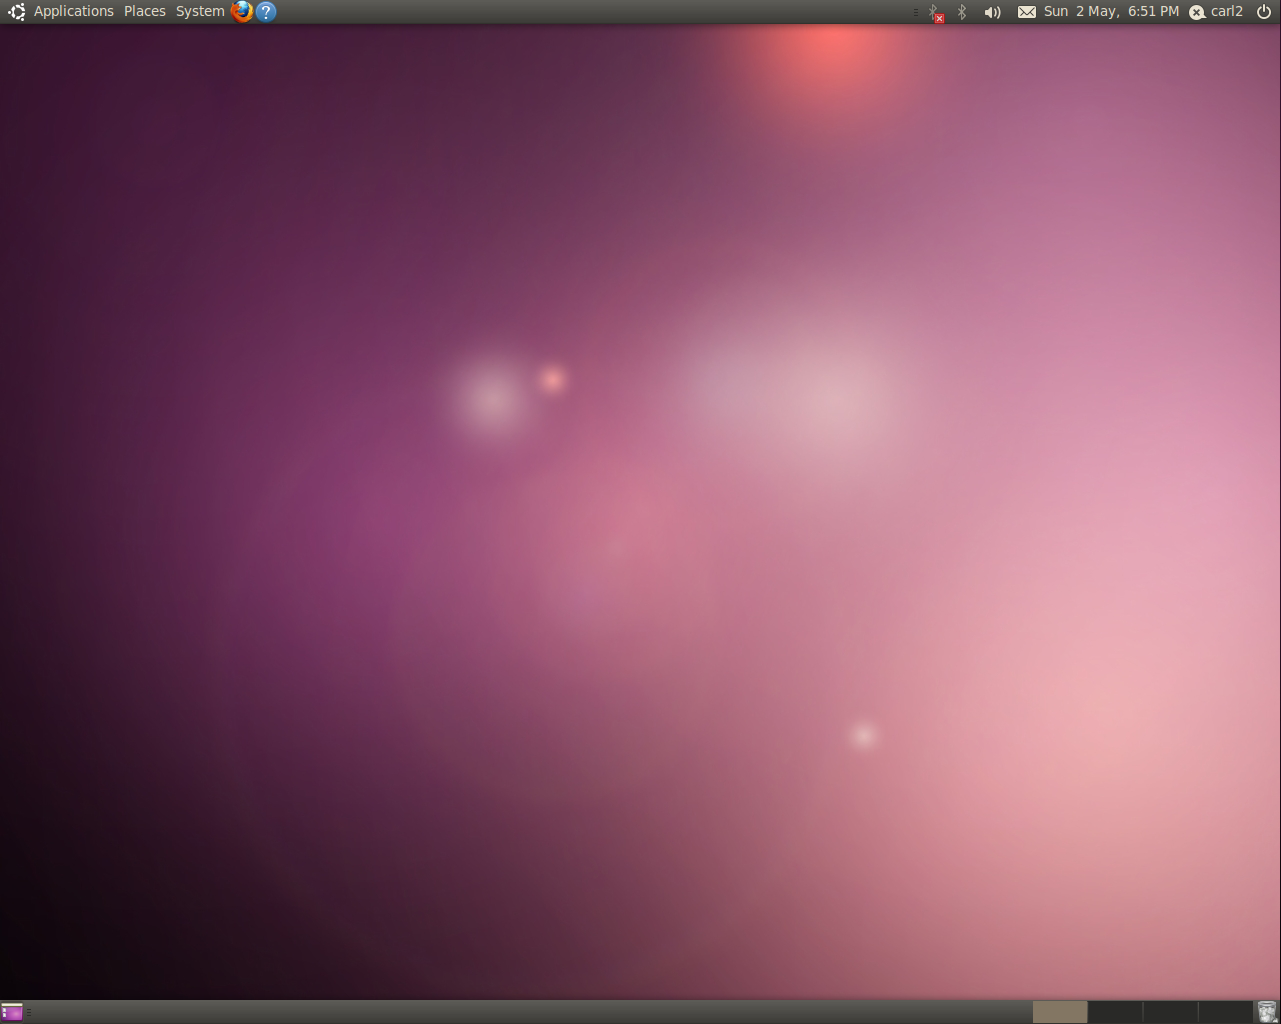
After a sprightly boot-up this is the fresh Ubuntu desktop. Not sure about that wallpaper but it's much better than the one seen previously during the beta.


The window controls are still in the 'wrong' place!


This is fairly easily sorted though. Do CTRL + F2, type "gconf-editor" and press enter. Navigate to Metacity -> general and then double click on the entry beside "button_layout" and change it so it looks like the screenshot below. Alternatively you can also switch to an older theme like Clearlooks that uses the normal button arrangement.


Conclusion

I have to say on trying a fresh install, this is the smoothest Ubuntu install I've experienced and possibly one of the smoothest OS installs out there. I'm starting to notice new little things like the waste basket/ trash is now the Rubbish Bin (in UK language settings) and I love the new font. The new sound applet is better than I expected, much improved over early versions, I might actually find it useful now with Rhythmbox. Hopefully it will eventually work with my favourite player Gmusicbrowser at some point. Also I notice deb files now open with the Software Centre by default.

My only niggle is that since I upgraded my laptop, it has upgraded Deluge to version 1.3.0, which isn't in the Deluge PPA, which means it won't connect to my Deluge daemon on my server, since they have to be the same version. I'm keeping my server on the LTS release so I'll see if I can downgrade my laptops Deluge client. At the moment I can make do with using the web interface instead. Update 14/10/10: version 1.3.0 has now arrived in the Deluge PPA.

Many of 10.10's new features are under the surface and on an upgrade from 10.0.4 it's harder to spot them at first. On a fresh install though you can see that a lot of work has gone into making it as easy and smooth as possible. I'm going to explore 10.10's features as I go along on this laptop but I'm keeping my desktop on 10.0.4 and servers which will only be upgraded when the next LTS arrives.

Download Ubuntu here


Enhanced by Zemanta

Saturday 4 September 2010

How to setup Firefly Media Server on Ubuntu 10.0.4


Firefly, formerly known as the incongruously titled mt-daapd is a server based streaming app that streams to DAAP clients like iTunes, Banshee and Rhythmbox (see screenshot above) or hardware players like the Roku Soundbridge. Unfortunately iTunes 10 cannot access Firefly at the moment, hopefully this will be sorted soon. Since I'm installing this on a headless Ubuntu 10.0.4 server I'm using commandline configuration, accessing it from my laptop via ssh. Either enter these commands sitting at the server in a terminal, or ssh into it from another PC that has a terminal or ssh client. Enable ssh access to your server with sudo apt-get install ssh and login to your server with ssh ip-address - for example: ssh 192.168.16.14


Install Firefly


sudo apt-get install libid3tag0 (I think this ensures Firefly can read mp3 tags, it's usually installed already in Ubuntu)

then:

sudo apt-get install mt-daapd


Configure Firefly

Next you need to edit Firefly's config file:

sudo nano /etc/mt-daapd.conf


Use Ctrl + W to find the parts of the config file you want to edit. First you need to edit Firefly's admin password (replace password with something you'll remember that's secure):

admin_pw = password


Next add your music folder - mine is:

mp3_dir = /storage1/music


You can also have a password for playing music (the one you enter in the player e.g. iTunes) - remove the '#' and replace mp3 with a suitable password, but this is entirely optional.

#password = mp3


Then you might want to change the Firefly server name, I've named mine "server2-Firefly".

servername = Server2-Firefly %v on %h


Next start Firefly with:

sudo /etc/init.d/mt-daapd start


Now you should be able to log in to Firefly's admin page from your web browser on your network.

http://servers-ip-address:3689

for instance mine is http://192.168.16.14:3689

or if you are configuring it on your server:

http://localhost:3689


Here you can rescan the collection, set scanning preferences and various other options. And that's pretty much the whole setup. You may have to set your music folders permissions so they they can be read by everyone, so Firefly can see all your music. Now you should be able to play your Firefly server's music from Rhythmbox, Banshee, Amarok, iTunes or whichever DAAP client you use. Rock on!

Friday 13 August 2010

Apple iPad Review


Yesterday I had my first go on an iPad, several iPads actually since they had one in Comet and several in Currys, both shops being in the same area of Triton Road, Lincoln. Apologies for the poor photo, I had to be discreet and use my phone. Having heard people going on about the device for ages, with all the hype, I was expecting to be blown away, or at least a bit impressed. But it was not a very 'magical' experience for me, not helped by the fact my fingers still hurt from typing on the on-screen keyboard. I managed some Tweets, browsed the net and checked out the various apps installed. It was annoying trying to select part of a URL to delete it and it was harsh to type on without feedback. I could have attached it to the keyboard accessory, but that seems like defeating the object of a tablet.

I played with it for awhile in Currys, I must have been there for about 20 minutes without being hassled by staff, plus the time I spent on the one in Comet, so I had plenty of time to explore it. The iPad is most at home playing music and videos, and viewing photos, which was the only thing that impressed me, a bit. The way you can flick back and forth with your finger, and zoom in and out by moving your fingers together and apart was nice. Also doing this with web pages was useful too, though I couldn't seem to get the page to stay zoomed in like that. Auto-switching between landscape and portrait when it is turned round was nice too. Browsing through iTunes was OK apart from I kept accidentally selecting things. I suppose at least it could play music and browse the web at the same time, which is something...

I then tried the "Magic Piano" app that, having seen many videos of it, I expected better. The lag was atrocious! It was difficult to play a proper tune or chord sequence when the sound took a few seconds to play after hitting the keys, no matter what instrument I chose. I suppose the only realistic instrument to emulate would be a Mellotron, perhaps that's why there's a Mellotron app, even then the lag is longer than most Mellotron's I've seen in videos. And it was hard to actually play a chord without my fingers touching other notes by mistake.

Overall I wasn't blown away by it and I was not comfortable browsing the web on it for more than a few minutes. For viewing photos, music and videos it's fine, but it seems a very expensive toy just for those features, I was more impressed by an £79
Eken tablet from Amazon than this, which has the greater freedom provided by the Android OS, though i think I might save my fingers for something with a keyboard or a stylus. I certainly wouldn't recommend a tablet like the iPad for those who have even the slightest RSI!

Thursday 12 August 2010

Integrating GMX Storage as a network drive via Nautilus in Linux

This is quite a simple way to access your GMX online storage in nautilus, I found this trick on this forum post, so I'm posting it here in case it disappears.


1) In nautilus' location bar, type this in and press enter:
davs://storage-file-eu.gmx.com/ (or davs://storage-file-us.gmx.com if you live in the US).


2) Enter your GMX e-mail address and password when prompted:


3) And now your GMX storage appears in nautilus:


Tuesday 10 August 2010

PC vs Mac: Here's what you (really) need to know

Microsoft really must be getting desperate when they resort to simple mud-slinging to get people to buy there products. MS has a new page on their website on why you should get a PC rather than a Mac. Here's just some of their points and my response:

"Macs can’t connect to an Xbox 360" Why? because MS made it that way! Also you could use open source software to stream media to your 360 on any OS.

"Macs take time to learn" ALL operating systems take time to learn. As soon as you start to use a computer, you have to learn how to use it. It just depends where you start from! If you started off from Mac or Linux you would take time to get used to Windows.

"Apple’s productivity suite file formats won’t open in Microsoft Office on PCs." Er... MS Office available on the Mac. Also if MS file formats were truely open there wouldn't be any problem on any OS.

"It’s easy with a PC." It's easy on the Mac too. It depends what you want to do, some things are easier on Windows, some easier on the Mac, some easier on Linux.

"If there’s a Mac version of a program you need, you’ll have to buy it again and relearn how to use it on a Mac." Again, that works both ways, same argument as previous point. Plus there's plenty of free equivalent software on the Mac.

"Macs don’t work as well at work or at school." Increasing numbers of schools and university students use Macs.

"With PCs running Windows 7, you can play the videos and music stored on your home PC while you’re on the go, for free." Try Subsonic which is cross-platform, and also has iPhone and Android apps.

Microsoft should just concentrate on making a good product (or trying to) and not mud-slinging.

Saturday 24 July 2010

Make Root's Apps Fit into Your Gnome Desktop

Having found a nice combination of icons and themes for Gnome that I like, it's mildly annoying when apps that run as root (such as Synaptic) look ugly because they use a very plain theme. I've been looking for this for awhile and stumbled across this solution by the user "FuturePilot" in an old thread in the Ubuntu forums:

sudo ln -s /home/.themes /root/.themes
sudo ln -s /home/.icons /root/.icons

This is a nice simple solution to the problem, so now Synaptic fits in with my desktop. My theme consists of Bluman-Clearlooks controls, Clearlooks window borders, and Reblumanity icons.

Sunday 18 July 2010

5 Useful Audio Apps For Ubuntu Linux

For a long while Linux seemed a bit lacking in good audio apps, but it's improved so much in a short space of time and it's getting better all the time. Here I've gathered the necessary apps to get your music ripped, tagged, edited and played.


Audex CD Ripper

I've trawled the net for a good CD ripper on Linux and they all seem to be not quite what I want. Basically, I'd like a CDex for Linux. CDex sort of works under Wine but has trouble with the DVD drive sometimes locking it for other apps once I've closed it. I've found Audex to be the closest to it, plus it has album art downloading which CDex hasn't got. It is a KDE app so theres some KDE dependancies, but it looks and works fine on the Gnome desktop.


Audex is available from the Ubuntu repositories or from their site as source code.

Also consider: Sound Juicer, Rubyripper, Rhythmbox (a player that and rips)


Puddletag Mp3 Tag Editor

This is a relatively new app but it's quite well featured. It's loosely based on the Mp3tag available on Windows it is a good Linux alternative to it. I really like the Filename --> Tag and Tag --> Filename conversion it shares with Mp3tag, which other Linux apps generally lack. Another good conversion is it's case conversion which Mp3tag doesn't have. It's almost there, I only occasionally find my self going back to Mp3tag in Wine.


Download and installation instructions

Also consider EasyTag, Audio Tag Tool, Picard all available from the Ubuntu repos and Mp3tag under Wine.

  • Update 29/08/10: I have since found EasyTag to be more reliable and stable than Puddletag. EasyTag is very good, once you get used to the way it works.


Audacity Audio Editor

This really needs no introduction, it's probably the best free audio editor on any OS! It does look a bit different here due to my Ubuntu theme.


It's available from the Ubuntu repositories and from the Audacity site

Also consider: Traverso, LMMS, amongst others.


EasyMp3Gain

This is great GUI (Graphical User Interface) to the commandline mp3gain, vorbisgain and aacgain volume normalisation tools. Again, I used to use the Windows version of Mp3gain in Wine but having found EasyMP3Gain in the Ubuntu repos, I've switched and found it a lot quicker!


Also consider: Mp3gain under Wine.


Gmusicbrowser

For a long time I kept switching between various music players on Linux trying to find one that worked best for me. I used to be an Amarok fan before Amarok 2 came along, even by then it didn't really fit in with the Gnome desktop I'd switched to. I switched to Gnome having had so much trouble with Kubuntu, it always felt like Ubuntu's neglected brother. Having been recommended by a fellow Blogger user, Apocrypha, I tried Gmusicbrowser, and have found it to be lighter but feature-rich. It has good tagging support like Foobar on Windows and I like it's tray pop-up that gives you easy access to the controls. Unlike Rhythmbox, you can just hover over the icon. And the full controls are there, rather than just play/pause in Rhythmbox. The only thing Gmusicbrowser could do with is better USB device support.


Gmusicbrowser is available to install from the Ubuntu repos.

Also consider: Rhythmbox, Banshee, Foobar under Wine, and various others, just try them out, it costs you nothing but time!


And there we go, from ripped to playing, I think we have it covered!

Monday 24 May 2010

8 Useful Google Chrome/Chromium Extensions (for Firefox fans)

When Google Chrome first came out, I found it much too basic, too lacking in features, however it has since grown much more useful since lots of extensions have been available. I'm using Chromium (the source code of which filters down to Chrome) on my old Compaq N400C (850Mhz/256MB RAM) laptop. I've recently upgraded the hard drive (from a 4200RPM 30GB to a faster 5400RPM 40GB drive) and did a fresh install of Ubuntu 10.0.4 LTS. Having found the Gnome desktop to be a little sluggish, I've installed the Lubuntu (LXDE) desktop, which comes with Chromium. Lubuntu looks great and works at a reasonable speed. I still use Firefox sometimes, but Chromium is lighter on resources and not as basic as Midori. I've been searching for extensions similar to my Firefox add-ons and have found these so far:


An essential extension! Though not quite as good as AdblockPlus in Firefox, this is the next best thing for wacker-moling those pesky ads.


Again, it's not quite as good as the Firefox equivalent, but good enough to prevent my old laptop from grinding to a halt under flash web elements.


Chromed Bird

On my desktop I love using Gwibber for keeping up with my Twitter (and Facebook) feed. However it's a little too resource hungry for my ageing laptop, so this is a good substitute. For Firefox, the equivalent add-on is Echofon.


I've been using this in Firefox for awhile, so I'm glad to have it in Chrome/Chromium, the only feature it lacks compared with the Firefox version is it lacks password sync. Syncing open tabs is a fairly new and useful feature.


Another useful bookmarking addon. I've been using in Firefox addon equivalent for a while.


For those who need their Greasemonkey scripts this extension gives "a little bit more Greasemonkey compatibility"


This extension/add-on is for sharing URLs to social networking sites, automatically creating a short URL, and is available for Chrome/Chromium and Firefox.


One of my favourite ways to while the hours away when bored!

Update: Google Chrome has just reached the landmark stable version

Sunday 2 May 2010

Ubuntu 10.0.4 LTS: First impressions

10.0.4 LTS (codename: Lucid Lynx) is the latest version of Ubuntu, released just a few days ago. I did a fresh install on a HP D530 desktop (Pentium 4 2.8ghz, 2GB RAM, 40GB hard drive) and also upgraded my home-built desktop (AMD Athlon 64 2.4ghz skt 939, 3GB RAM). Here's my thoughts so far:


Sometimes it's the little things that impress me about a new OS release. For instance, during a fresh install, Ubuntu detected my time-zone so I didn't have to carefully pinpoint it on the map. There's now an installer slideshow while you wait the usually short (around 15 mins on an average PC) time until it completes. Once it finished and rebooted I was amazed at the boot time, booting in seconds, I barely had time to admire the new boot-splash screen!


The default desktop now looks pretty slick, feeling similar to OSX, especially with the default wallpaper and title-bar button layout. However, if like me you prefer it how it used to be, it's fairly easy to change. (click the screenshot for a better view).


1. Press ALT + F2 to get a run box
2. type gconf-editor and press return
3. Navigate to Apps --> metacity --> general
4 Find the entry "button_layout"
5. Double click "close,minimize,maximise" on the right-hand side.
6. Edit the entry so it reads: "menu:minimize,maximize,close"
7. hit enter and you're done :)


One of the main features of this release is the new MeMenu. Once you have setup your chat accounts in Empathy (now the default messenger client) or Pidgin (which i still prefer), you can now update your Facebook and/or Twitter status from the text box in the MeMenu. Ideal for a quick tweet! By default it updates both FB and Twitter, but if you want, you can set just one in Gwibber, Ubuntu's default social media tool. I've been using it since 9.10/Karmic, and it has become even better in Lucid. Tweets now show up in speech bubbles and it's easier to differentiate between others and your own tweets. My only niggles are the buttons to select just Facebook or Twitter are too similar in shade. It is also still impossible to retweet a full, 140 character tweet, as it counts the 'RT @username' bit as part of this tweet.

MeMenu:


Gwibber:


Overall, 10.0.4 feels like a slicker, improved OS over the previous 9.10 (Karmic) release, a worthy upgrade, especially considering it is an LTS (Long Term Support) which means you won't have to upgrade for a long time if you don't want to. The only other niggle I had to attend to the volume control applet to the main panel was missing from startup items (add gnome-volume-control-applet to startup items), but easily fixed. This is the first time I haven't immediately changed the theme on a fresh install. The slick new theme is a refreshing change from the previous yucky brown releases, unless you were the minority who really were into brown. I should also mention the Ubuntu Software Centre has improved since last time, it feels a lot easier to find and install packages now. There's also the new Ubuntu One Music Store integrated into Rhythmbox, that I have yet to fully play with but seems to be a good alternative to the iTunes store. Ubuntu One is more integrated this time and actually connected at login every time, unlike in Karmic.

Download Ubuntu here.

Monday 1 February 2010

Choosing hardware and software for your next Linux computer.


Software

When choosing to buy or build a computer, I would first off think about what you want it for, and then choose the software then the right hardware. If you going to be doing professional graphics/audio/video work, I'd consider a Mac, as there are some good second hand deals out there. My Powermac G4 (dual 1Ghz MDD, with 2GB ram, room for 4 IDE hard drives) is still a good usable machine, even for light multimedia usage. The only real reason to use Windows is really for games, although there are quite a few, mostly non-commercial, games for Linux and Mac. Even then you can still dual-boot a PC or a Mac. I only boot into Windows for the occasional game of GTA SA and Need For Speed games. You can also play a certain amount of Windows games using WINE. For native Linux games, DJL is a great Steam-like game manager that makes it easy to find what you want.

If you need a machine for an everyday desktop work, web browsing, playing music, media server, and everything else, you can't go wrong with Linux. For me, Ubuntu is the most user-friendly distro. It's the one I have had the best experience with and I feel like it keeps getting better. Feel free to play the distro feild, as it costs nothing but a little download usage. In fact you can get an Ubuntu disc sent to your door for free! Distrowatch is a good place to find the right distro for you. These days there's no reason not to go 64 bit, unless your hardware doesn't support it, as it supports more than 4GB of ram and can give a performance increase.


Hardware

When building or buying hardware for use with Linux, do a bit of Googling to see if anyone has had problems with your chosen hardware. At the moment Nvidia is the best choice for a smooth Linux experience. You'll be rewarded with good performance and lovely compiz goodness! I would avoid onboard graphics as the performance is not so good and it usually borrows from your RAM. Motherboard-wise you can't go wrong generally, except with specific makers e.g. Foxconn. For wireless cards, I have had the best luck with those cards with ralink chipsets. I've had several Edimax and Belkin cards (USB, PCMCIA and USB) that work well with Linux. I have to say I don't like USB dongle-type devices anymore as i have had them overheat and die on me. Most soundcards seem to work OK with Linux, some better than others. Despite problems in the past most Creative cards work fine, though you might need to research a little with X-Fi cards. For printers, HP and Epson work well, avoid Lexmark/Dell. Similarly as HP/Compaq support Linux a lot of there hardware works well with it. There's a good list of hardware makers that support Linux here. Also have a look at the Linux Hardware Compatibility database. After choosing the main hardware, choose a suitable case to house it in, with a decent power supply.
Reblog this post [with Zemanta]

Tuesday 19 January 2010

Create a new XFS+ partition in empty space on OSX, without spending any money!


Having recently cloned my Power-Mac G4's failing 80GB drive to a larger 120GB drive (maximum size allowed for it's onboard IDE), I needed to make use of the empty 38GB or so of space. Unfortunately Apple's drive utility doesn't have the ability to make a new partition in this space, it's pretty basic really. Having Googled around for a freeware OSX partition tool, it seems there isn't any, all I could find were paid for partition software and some complicated command-line tutorials.

So here's how to get your HDD space back:

1. Attach the drive via a USB/IDE adapter or drive caddy. Make sure it is set to Master.

2. Plug it in to a PC running Linux (I use Ubuntu), the Gparted live CD, or any other live CD with gparted.

3. Open gparted and select the correct drive (your XFS+ OSX boot drive should be visible and your free space). Right click and select unmount.

4. Right click in the free space and select create a new primary partition and select FAT32 as the filesystem, then click apply.

5. Safely remove or just shutdown your PC, then remove the drive from it's adapter or caddy.

6. Re-attach it your Mac, (making sure the drive's jumper is set to the correct position) and power it on.

7. Open Disk Utility and select your new FAT32 partition, it will be named something unfriendly.

8. Select Erase, and set the filesystem to XFS+ (Journaled), then it will format and it will auto-mount on your desktop.

9. Re-name the new volume as something useful. I named mine 'storage' as it's handy for downloads, software etc.

Job Done!
Reblog this post [with Zemanta]

Saturday 2 January 2010

A Beginners Guide To Ushare (Using Ubuntu)


This is a brief guide to getting UPNP sharing with Ushare working on Ubuntu, though should work on Debian and Debian-based distros.

Installing:

In a terminal, type:

sudo aptitude install ushare
(then enter your password when prompted)

(you could also open synaptic and search for and double-click ushare)

Quick configuration:

sudo dpkg-reconfigure ushare

Go through the dialogues, you can keep the default name 'ushare', then tell it where it will find your videos or audio, with a space between directories, something like:

/home/carl/music,/home/carl/video

..and that's the basic configuration done.

Advanced Configuration

To get ushare streaming to your Xbox 360 you need to edit the config file:

sudo gedit /etc/ushare.conf

and find and edit this line so it reads

ENABLE_XBOX=yes

Also enable the web interface:

# Enable Web interface (yes/no)
ENABLE_WEB=yes


..and then restart ushare with:

sudo invoke-rc.d ushare restart

You can now access the web interface by pointing your browser to
http://ip-address-of-server:49152/web/ushare.html

You will also need to invoke that command when you add more music/videos (or reboot) to make them appear in ushare, or refresh from the web interface.

You may need to do a little more fiddling, I don't have an Xbox to try it with, there's a more advanced guide for ushare and Xbox 360 here. and also here

For accessing your ushare server from another Linux desktop, I found a tutorial using djmount.
Update: Djmount is now available in the Ubuntu repositories, so there is no need to compile it, just 'sudo apt-get install djmount'

Here's how to start djmount on startup, reposted here just in case the source disappears:
The following steps do work for autostarting djmount under ubuntu:
cd /etc/network/if-up.d
gksudo gedit ./djmount
contents of script:
#!/bin/sh

# Not for loopback!
[ "$IFACE" != "lo" ] || exit 0
Then do
  
sudo modprobe fuse
cd /media
sudo mkdir upnp
sudo djmount -o allow_other /media/upnp

sudo chmod 755 ./djmount
sudo chown root ./djmount
sudo chgrp root ./djmount